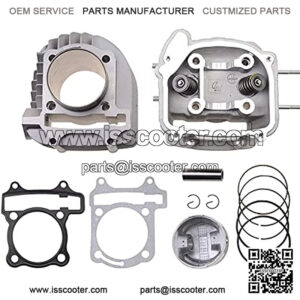
Step-by-Step Installation Guide for 62.5mm Big Bore Kit on GY6 170cc-200cc Engines
Introduction
Installing a 62.5mm big bore kit can transform your GY6 engine’s performance, but proper installation is critical. With our 20+ years of engine manufacturing experience, we’ve created this comprehensive guide to ensure perfect results.
Pre-Installation Preparation
Tools Required:
-
Torque wrench (1/4″ and 3/8″ drive)
-
Piston ring compressor (62.5mm specific)
-
Cylinder hone tool (240 grit stones)
-
Digital caliper for clearance checks
-
Gasket scraper and cleaner
Safety First:
-
Disconnect battery
-
Drain coolant and oil
-
Clean work area thoroughly
Detailed Installation Steps
1. Engine Disassembly
-
Remove cylinder head bolts in reverse torque sequence
-
Inspect crankcase for debris (use magnetic pickup tool)
-
Measure stock bore diameter for reference
2. Cylinder Preparation
-
Deglaze cylinder walls with hone tool (crosshatch 45° pattern)
-
Clean with hot soapy water (never solvents)
-
Verify 0.003-0.004″ piston-to-wall clearance
3. Piston Installation
-
Lubricate wrist pin with assembly lube
-
Install rings with gaps at 120° intervals:
-
Top ring: Chrome-faced (marked side up)
-
Second ring: Tapered design (dot toward crown)
-
Oil rings: Install expander first
-
4. Cylinder Assembly
-
Use ring compressor for damage-free installation
-
Tap cylinder gently with rubber mallet if needed
-
Verify free piston movement before proceeding
5. Head Installation
-
Apply torque sequence in 3 stages:
-
10 ft-lbs (initial seating)
-
18 ft-lbs (90° turn)
-
Final 22 ft-lbs (specification)
-
Critical Measurements Table
| Component | Specification | Tolerance |
|---|---|---|
| Piston clearance | 0.0035″ | ±0.0005″ |
| Ring end gap | 0.010-0.012″ | +0.002″ |
| Head bolt torque | 22 ft-lbs | ±1 ft-lb |
Post-Installation Checks
-
Valve adjustment (0.003″ intake, 0.004″ exhaust)
-
Coolant system pressure test (15 psi for 10 mins)
-
Initial start procedure (prime oil system first)
Why Our Kit Outperforms
-
Precision-matched components: Every kit is trial-fitted at our factory
-
Included upgrades: High-temp MLS head gasket (vs. cheap fiber)
-
Support: Access to our technicians for installation questions
Pro Tip: For racing applications, consider adding our high-volume oil pump (sold separately) for maximum lubrication.
Troubleshooting Common Issues
Problem: Low compression after install
Solution:
-
Re-check ring gap specifications
-
Verify proper cylinder honing
-
Test with leak-down tester
Problem: Overheating
Solution:
-
Check coolant flow direction
-
Verify proper jetting (typically need +2 sizes)
-
Ensure proper radiator airflow